Difference between revisions of "High signal at zero oxygen"
From Bioblast
(Created page with "{{MitoPedia |description='A ''high signal at zero oxygen''' may be observed during zero calibration. The following instructions show how to further localize and possibly s...") |
|||
| (25 intermediate revisions by 6 users not shown) | |||
| Line 1: | Line 1: | ||
{{MitoPedia | {{Technical support}} | ||
|description=' | {{MitoPedia without banner | ||
|abbr= | |||
|description=A '''high signal at zero oxygen''' may be observed during [[zero calibration]] (R0). First, check the quality of the [[dithionite]] solution. The following instructions show how to distinguish between a defective sensor head and an electrical leak current. | |||
|info= [[Zero_calibration | Zero calibration]], [[OroboPOS-Connector_MitoPedia#Cleaning_the_electrical_connections | OroboPOS-Connector]] | |||
}} | }} | ||
{{ | __TOC__ | ||
== Leak current test== | |||
=== O2k-series J and XB === | |||
::::# Unplug the [[SmartPOS]] from the O2k-main unit. | |||
::::# Remove the membrane from the SmartPOS and wash the cathode and anode with distilled water. | |||
::::# Switch on the O2k and start DatLab. | |||
::::# Record the signal for 10 min. | |||
::::# Connect the SmartPOS to the O2k-main unit. Set an event in DatLab called "SmartPOS". | |||
::::# Record the signal for 10 min. | |||
::::# Send us the file. | |||
=== O2k-series D-I and XA === | |||
::::# Unplug the [[POS-Connector]] from the O2k-main unit and unscrew the [[OroboPOS]] from the [[POS-Connector]]. Screw the POS to the blue part of the perspex housing. | |||
::::# Remove the membrane from the POS and wash the cathode and anode with distilled water. | |||
::::# Switch on the O2k and start DatLab. | |||
::::# Record the signal for 10 min. | |||
::::# Connect the POS-Connector to the O2k-main unit without the POS. Set an event in DatLab called "POS-Connector". | |||
::::# Record the signal for 10 min. | |||
::::# Screw the POS to the POS-Connector. Set an event in DatLab called "POS". | |||
::::# Record the signal for 10 min. | |||
::::# Send us the file. | |||
=== O2k-series A-C === | |||
::::: Plugging or unplugging of the POS-Connector while the main unit is switched on could damage the POS-Connector of O2k-series A-C. Therefore, the following should be started with the O2k switched off. | |||
::::# Unplug the [[POS-Connector]] from the O2k-main unit and unscrew the [[OroboPOS]] from the [[POS-Connector]]. Screw the POS to the blue part of the perspex housing. | |||
::::# Remove the membrane from the POS and wash the cathode and anode with distilled water. | |||
::::# Plug the POS-Connector to the main unit. | |||
::::# Switch on the O2k and start DatLab. | |||
::::# Record the signal for 10 min. | |||
::::# Screw the POS to the POS-Connector. Set an event in DatLab called "POS". | |||
::::# Record the signal for 10 min. | |||
::::# Send us the files. | |||
=== References === | |||
::::::[1] [https://wiki.oroboros.at/index.php/OroboPOS-Connector_MitoPedia#Cleaning_the_electrical_connections Cleaning the electrical connections] | |||
::::::[2] [[MiPNet19.18B POS-service]] | |||
::::::[3] [[MiPNet06.03 POS-calibration-SOP]] | |||
::::::[4] [[MiPNet14.06 Instrumental O2 background]] | |||
=== Example === | |||
::: First, the OroboPOS-Connector and the POS were disassembled and disconnected from the main unit. Second, the OroboPOS-Connector was connected to the O2k-Main unit without the OroboPOS. Third, the OroboPOS was connected to the OroboPOS-Connector without membranes. After each step, the O<sub>2</sub> raw signal [V] was recorded for 10 min. The marks were set to the O<sub>2</sub> raw signal [V] to evaluate the leak current. | |||
::::[[File:High zero current good example.png|700px]] | |||
::::[[File:High zero current test bad exmaple.png|700px]] | |||
::::'''Figure 1.''' Leak current test. '''Upper panel:''' Leak current is in the range of ±0.00099 V. '''Lower panel:''' Leak current is higher than 0.00099 V when the OroboPOS-Connector is connected to the O2k-Main unit and when the OroboPOS is connected to the OroboPOS-Connector, indicating a potential electrical problem of both, the OroboPOS-Connector, and the OroboPOS. | |||
== Keywords == | |||
{{Template:Keywords: Oxygen signal}} | |||
{{MitoPedia O2k and high-resolution respirometry | {{MitoPedia O2k and high-resolution respirometry | ||
|mitopedia O2k and high-resolution respirometry=O2k hardware, O2k-Open Support, O2k-Respirometry | |mitopedia O2k and high-resolution respirometry=O2k hardware, O2k-Open Support, O2k-Respirometry | ||
}} | }} | ||
Revision as of 12:21, 13 October 2023


![]()
![]()
![]()
 |
High signal at zero oxygen |

MitoPedia O2k and high-resolution respirometry:
O2k-Open Support
Description
A high signal at zero oxygen may be observed during zero calibration (R0). First, check the quality of the dithionite solution. The following instructions show how to distinguish between a defective sensor head and an electrical leak current.
Reference: Zero calibration, OroboPOS-Connector
Leak current test
O2k-series J and XB
- Unplug the SmartPOS from the O2k-main unit.
- Remove the membrane from the SmartPOS and wash the cathode and anode with distilled water.
- Switch on the O2k and start DatLab.
- Record the signal for 10 min.
- Connect the SmartPOS to the O2k-main unit. Set an event in DatLab called "SmartPOS".
- Record the signal for 10 min.
- Send us the file.
O2k-series D-I and XA
- Unplug the POS-Connector from the O2k-main unit and unscrew the OroboPOS from the POS-Connector. Screw the POS to the blue part of the perspex housing.
- Remove the membrane from the POS and wash the cathode and anode with distilled water.
- Switch on the O2k and start DatLab.
- Record the signal for 10 min.
- Connect the POS-Connector to the O2k-main unit without the POS. Set an event in DatLab called "POS-Connector".
- Record the signal for 10 min.
- Screw the POS to the POS-Connector. Set an event in DatLab called "POS".
- Record the signal for 10 min.
- Send us the file.
O2k-series A-C
- Plugging or unplugging of the POS-Connector while the main unit is switched on could damage the POS-Connector of O2k-series A-C. Therefore, the following should be started with the O2k switched off.
- Unplug the POS-Connector from the O2k-main unit and unscrew the OroboPOS from the POS-Connector. Screw the POS to the blue part of the perspex housing.
- Remove the membrane from the POS and wash the cathode and anode with distilled water.
- Plug the POS-Connector to the main unit.
- Switch on the O2k and start DatLab.
- Record the signal for 10 min.
- Screw the POS to the POS-Connector. Set an event in DatLab called "POS".
- Record the signal for 10 min.
- Send us the files.
References
Example
- First, the OroboPOS-Connector and the POS were disassembled and disconnected from the main unit. Second, the OroboPOS-Connector was connected to the O2k-Main unit without the OroboPOS. Third, the OroboPOS was connected to the OroboPOS-Connector without membranes. After each step, the O2 raw signal [V] was recorded for 10 min. The marks were set to the O2 raw signal [V] to evaluate the leak current.
- First, the OroboPOS-Connector and the POS were disassembled and disconnected from the main unit. Second, the OroboPOS-Connector was connected to the O2k-Main unit without the OroboPOS. Third, the OroboPOS was connected to the OroboPOS-Connector without membranes. After each step, the O2 raw signal [V] was recorded for 10 min. The marks were set to the O2 raw signal [V] to evaluate the leak current.

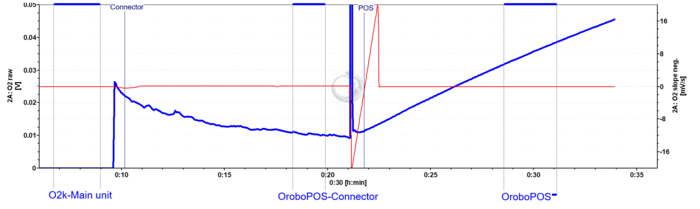
- Figure 1. Leak current test. Upper panel: Leak current is in the range of ±0.00099 V. Lower panel: Leak current is higher than 0.00099 V when the OroboPOS-Connector is connected to the O2k-Main unit and when the OroboPOS is connected to the OroboPOS-Connector, indicating a potential electrical problem of both, the OroboPOS-Connector, and the OroboPOS.

Keywords
- Bioblast links: Oxygen signal - >>>>>>> - Click on [Expand] or [Collapse] - >>>>>>>
- Specific
- O2k-Procedures
- MiPNet O2k-Procedures
- General
- » Oxygen, dioxygen, O2
- » Oxygen calibration - DatLab
- » Oxygen solubility
- » Oxygen solubility factor
- » Oxygen pressure
- » Concentration
- » Activity
- » Pressure - Pascal
- » Barometric pressure
- » High-resolution respirometry
- » OroboPOS
- » Polarographic oxygen sensor
- » MitoFit Quality Control System
- » Sensitivity
- General
- Other keyword lists
MitoPedia O2k and high-resolution respirometry: O2k hardware, O2k-Open Support, O2k-Respirometry